
Showing posts with label Food. Show all posts
Showing posts with label Food. Show all posts
5.28.2012
French Bread - Revisited
After a while it has come to fruition, the bread, that is. I certainly can’t take the credit, or really care about credit anyway, but the bread is rather extraordinary. And, so here are some tips for the couple thousand hits due to the ‘French Bread’ title, google based blog, and whatever treatments it receives from their search engines.
Without the aid of a professional steam oven in my small townhome kitchen, I have used the wonderful training received during those formative years in Princeton Day School Intermediate Science classes. It was a rather good school - it even had a planetarium. I call the training ‘good science’.
First: Estimating the moisture content to be about 67% to 70%, water weight divided by flour weight, seems to make a rather perfect combination of fluffy inside and crispy crust.
Degassing: Very important. Squeaking out those bubbles of trapped gases is quick and enables long rises with ever-developing flavors.
Don’t Rush: Have extended the rise, especially the last one to two hours before turning on the oven. Cooler temps, longer rise, more flavor.
Lame: Visit the King Arthur website and get those razor cuts going in the right direction.
Steam: Wetting the dough after cutting, with hot water from a spray bottle taking one’s time about it, being a bit messy, will provide the extra moisture to allow the bread to really rise.
Temps: Preheating to 435 works. After placing the dough in the oven, an oven temp of about 375F to 400F for about 10 minutes is great and causes the wetted dough to really rise. I have a crappy oven. Then, about 12 minutes later after cooking at 430F to 435F, increase to 450F for the last 6 to 8 minutes. Creates an amazing flavor in the crust.
Rice Krispies: So, now there’s a little more ‘hands-on’ time but the reward is a loud crescendo of snapping and popping as the smooth crust crackles like a loaf purchased at Boulangerie Saint Preux walking up Rue Lepic, well almost.
Cheers and Have Fun.
12.30.2011
Baguette Recipe

There are a million bread and baguette recipes out there and I was looking for one that worked in my electric oven in the 78°F of a/c Florida life. I know what a baguette tastes like and how it is made in Europe, and I wanted it here. This recipe has thirty minutes of ‘hands on’ time over a five and a half hour timeframe. “Easy’ is prevalent in our recipes as thirty minutes is unacceptable for most of us. "Easy" recipes are rarely acceptable. In my world, this is easy and much less expensive than a weekly ticket to France. Click HERE for King Arthur Flour professional video link for the ‘easy’ shaping techniques to make the bread great.
Enjoy Munchkin.
Poolish
- 1 cup cool water
- 1/4 teaspoon active dry yeast
- 2 cups King Arthur Bread Flour
Dough
- 1 teaspoon active dry yeast
- 6 oz lukewarm water (414 g. water; 600 g. flour; ~69%) *
- all of the poolish
- 3 cups King Arthur Bread Flour
- 1 1/2 to 2 teaspoons salt
*Use ~1 oz less in a humid environment, ~1 oz more in a dry climate, or somewhere in between.
Directions
1. Make the poolish by mixing the yeast with the water, then mixing in the flour to make a soft dough. Cover and let rest at room temperature for about 14 hours, or overnight.
2. Mix active dry yeast with the water, then combine with the poolish, flour, and salt. Mix and knead everything together at a lowest speed to incorporate the ingredients (and make adjustments) until you've made a soft, somewhat shaggy dough - it should be cohesive, but the surface may still be a bit rough.
3. Cover and let dough rest for 30 minutes.
4. Knead for about 5 minutes on speed 2 of a stand mixer. The dough should then be smooth and elastic showing good gluten development.
5. Place the dough in a medium-size lightly olive-oiled bowl, cover, and let the dough rise for 3 hours, gently deflating it and turning it over after 1 hour, and then again after 2 hours. The deflating and turning can be done on a lightly floured work surface - the final one should be - stretching it and folding all four sides, tamping gently to degas.
6. Divide it into three equal pieces. Pre-shape each piece into a rough, slightly flattened oval. To shape, slap/pat gently with the heel of the hand to degas and then pull and fold top 1/2 over, then pull and fold top corners, then small folds from the top with fingers curled over the top edge and the thumb and palms pushing/oscillating forward on the work surface until it forms a smooth and soft long oval.
7. Cover with towel/plastic wrap or greased plastic wrap, and let them relax for 20 to 30 minutes.
8. With the seams up (ends right to left), pat out the gas, flattening. Fold top 1/3 over and press in with fingers removing more gas, turn 180° and repeat. Start at one end working to the other end and fold top third+ over and down with one hand (fingers wrap over and thumb buries in), pat/press the dough with heal of other hand to meld and degas, fold & press, fold & press... Repeat, but take fold and seam all the way over to the surface edge.
9. With the seam-side down, cup your hands and very gently roll the dough into a 16" to 24" log. Finger tips and base of hand stay in contact with work surface when rolling. Start in middle and roll back and forth out to the ends. Place the logs seam-side up onto a lightly olive-oiled or parchment-lined sheet pan.
10. Cover them with a floured towel/plastic wrap or lightly greased plastic wrap, and allow the loaves to rise till they've become puffy, about 1 to 1 1/2 hours depending on room environment.
11. Preheat oven to 435°F to 450°F.
12. Using a bread lame or sharp knife, make 3 to 5 angled slashes in each baguette. Mist the baguettes heavily with warm water to help them develop a crisp crust.
13. Bake the baguettes until they're a very deep golden brown, 25 to 30+ minutes. Remove them from the oven and cool on a rack. Optimum time and temperature varies with different ovens.
~6 hours
12.29.2011
Bread Lame

To make bread rise in our home non-steam ovens, it takes a good cut and some serious water misting. I like stuff that lasts, not plastic or such garbage and after seeing the King Arthur Flour video (link at the end here) I realized how simple a lame was.
So, I made one with stuff I had lying around. All you need is a piece of 1/8 inch brass hex rod, available at your local hardware store, a pack of old-fashioned razors, and optional is a small piece of wood for a handle.
Squeeze the razor by the ends and it will curve and slide onto the hex rod and when in place will not turn or slide. It has a nice curve to get under the dough surface. Add a bend in the hex rod of about 15 degrees for more comfort.
If you want to get fancy, you can fashion a handle - drill it for the hex rod and glue or just add a slight kink in the rod to hold it tight. More fancy, taper it to make the hand feel more yummy. Fancier yet, sand the wood and let some olive oil soak in. And, if you’ve gone this far, might as well rub it with a candle and then a small cloth to melt the wax into the wood for a nice shine.


To view a video of scoring bread, click here to visit the King Arthur Site.
Cheers.
10.15.2011
Molasses Bread

Molasses Breakfast Bread
This bread is a dense dark and rich bread that is great for breakfast with lots of butter or cream cheese spread on thick toasted slices. It can be made with raisins, dates, dried apricots, or whatever you might like. It does not contain a lot of sugar and I use black strap molasses, which is not that sweet. It makes for a hearty breakfast meal that will last until the afternoon lunch.
Ingredients:
1/2 cup lukewarm water
1 tbs. sugar
2 tsp. yeast
1/2 cup warm milk
4 cups bread flour
3 to 4 oz. blackstrap molasses
1/2 tsp. salt
3/8 cup butter
1 egg
1 1/2 cup total - raisins & chopped apricots
- In a cup, stir the sugar into lukewarm water and then sprinkle the yeast on top. Let it stand without stirring for about 8 to 10 minutes.
- To 2 cups of flour add the salt, butter (softened), molasses, beaten egg, and the warm milk. Mix a few minutes until the mixture is smooth with few lumps. Slowly add the remaining 2 cups of flour and knead the dough on the lowest setting for about 6 to 8 minutes total. After about 3 minutes of kneading, the raisins and chopped apricots can be added.
- The dough will be quite sticky and but should not be wet and sticking to the bowl - add a bit more flour if needed.
- Cover the dough and let it rest for an hour. Knead gently for a minute and transfer to a 5 by 9 inch greased medium bread pan.
- Cover with a towel and let it rise from 2 to 4 hours until it at least doubles in size. The time to rise varies with temperature and if it needs to sit for 5 hours, that is fine.
- Bake at 375 degrees F for 35 minutes. Cool on a wire rack. You can brush the top with melted butter to soften the top crust if you like.
The bread keeps well although sometimes we cut the loaf in half and freeze it for later in the week. Regular molasses can be used but it is sweeter and with less flavor.
10.02.2011
Lemon Gelato

Both recipes produce a remarkably authentic gelato. In Italy gelato varies with region, or with what region the maker is from. I noticed two types: one made with just zest, which was often less sweet and very refreshing, almost like a granita; and a second with lemon juice that was often creamier and much sweeter. I use organic whole milk and raw sugar, and only the yellow part of the zest. These recipes make about 10 half-cup servings.
With Lemon Juice (faster)
Ingredients:
2 cups whole milk
1/2 cup sugar
5 egg yolks
Zest from 3 to 4 lemons
1⁄4 tsp vanilla extract (option - warms the taste)
1/2 to 3/4 cup lemon juice
- In a small saucepan combine milk, lemon zest, and vanilla. Place over medium-low heat just until steaming; do not boil. Remove from heat, cover, and allow mixture to infuse for about 20 minutes.
- In a medium bowl, whisk together egg yolks and sugar. Strain infused milk into a pitcher, then whisk it into yolk mixture.
- Pour mixture into a clean saucepan, and place over medium-low heat (heat to steaming, not boiling). Stir constantly with a wooden spoon until it forms a custard thick enough to coat back of spoon and leave a trail when a finger is run over the spoon, about 10 minutes. (Don’t overheat; doing so will change the flavor and it may curdle).
- Cool mixture by placing bottom of pan in several inches of cold water and ice; give it an occasional stir.
- Transfer to a bowl, stir in lemon juice, and refrigerate until well chilled, at least 1 hour.
- Transfer to an ice-cream machine, and process according to directions.
- Transfer ice cream to a container, and return to the freezer for about 2 hours to ripen.
Zest Only
Ingredients:
2 cups whole milk
Zest from at least 4 lemons
1⁄4 tsp vanilla extract
1/2 cup sugar
5 egg yolks
Pinch salt
- Heat the milk in a saucepan to a low simmer (until steaming), but not boil.
- Put the lemon zest and vanilla in a bowl, and add the hot milk. When cool, cover and allow to infuse for about 8 hours or overnight in the refrigerator.
- Strain the milk into a saucepan, add half the sugar, and bring to a simmer.
- Whisk the egg yolks with the remaining sugar until combined.
- Gradually dribble the hot milk into the egg yolks, half a cup at a time, whisking, to heat the yolks without cooking them. When all the milk has been added, cook the sauce over medium heat, stirring continuously, for about 5 to 10 minutes or until the sauce is thick enough to coat the back of a spoon and leave a trail when a finger is run over the spoon. (Don’t overheat; doing so will change the flavor and it may curdle).
- Stir in a pinch of salt, and strain into a bowl set over ice. Cover, and refrigerate for at least 6 hours or overnight.
- Transfer to an ice-cream machine, and process according to directions.
- Transfer ice cream to a container, and return to the freezer for about 2 hours to ripen.
3.29.2011
Neapolitan Pizza

Evolved and adapted from Vincenzo Buonassisi's PIZZA Plus, William Collins & Sons Ltd. 1985, watching cooks in restaurants in Italy, and from Tony Gemignani Neapolitan Pizza video on YouTube. The point of this evolution is that it is easy, real, a quick but incredible supper, and you can live on this stuff and stay skinny. It looks long at first but goes pretty fast after a few times.
Your mixer does the work, but it takes about 3 1/2 hours from start to using the dough. The recipe makes 4 to 6 balls of dough and I usually only use 1 ball and freeze the rest in individual sandwich bags. For large pizzas divide into 4 balls, for individual pizzas, divide into 5 or 6. To defrost, put the frozen dough into a bowl covered with plastic wrap and leave out at room temperature for 4 or 5 hours. Then put in refrigerator and use after it has cooled a bit, or in the next day or two. I eat this for lunch once or twice a week and it takes about 20 minutes from start to table.
Ingredients:
Starter:
1 cup King Arthur Bread Flour
2 1/2 teaspoons of active dry yeast
3 oz of water
Dough:
3 cups of King Arthur Bread Flour
10 oz of water
1 teaspoon salt
Slight adjustments in flour and water may need to be made depending on flour type and where you live. Experiment.
Basic Topping:
Crushed peeled San Marzano tomatoes. Or, I use a can of Muir Glen Organic Fire Roasted Diced Tomatoes. Puree using a Cuisinart Smart-Stick type mixer or blender. This will store for a long time in the fridge and only about 2 tablespoons are used per pizza. If too wet, sieve off a bit of the liquid.
Whole milk mozzarella (the fat slows down the carbs - so avoid skim/processed crap). Use a brick of cheese, not grated!
Directions:
Starter:
Dissolve the yeast in 3 oz of warm water and allow it to stand for a few minutes. In the mixer bowl, add the cup of King Arthur Bread flour and then the water/yeast and mix until a shaggy dough is made. Mix with a wood spoon and then ball up with hands as it’s quicker than using the electric mixer. Cover the mixer bowl with a plate (or plastic) and allow it to remain at room temperature (or slightly warm place) for 1 hour.
Dough:
After the starter has fermented for an hour, add salt and 3 cups of flour to the bowl. Turn the started dough with the wood spoon and mix it a bit with the flour. Add the 10 oz of water. Knead by hand (for a long time) or use 1 speed of KitchenAid mixer with the dough hook until mixed and then speed 2 for about 5 to 6 minutes. The longer the kneading, the more soft, smooth, and elastic the dough. After kneading, cover the mixing bowl with a plate and let rise at room temperature (or slightly warm place) for 1 1/2 hours or so.
Scrape out the dough onto a floured work surface (a yogurt container lid cut in half works well as a scraper) and gently form into a long log. Divide the dough into 4 to 6 equal portions. Put what you’re going to freeze into sandwich bags squeezing out the air and put in freezer. For dough to be used, place into a large cereal sized bowl and cover with plastic wrap. Place in refrigerator for at least an hour before use. The dough will puff up a bit. It can remain in the fridge for a day or two before use. Bring it out of the fridge a few minutes before use to warm just slightly. A trick to pushing out an even thin pizza is to have the dough cold - that’s what they do in the restaurants.
Pushing Out the Pizza:
The best way to learn this is to watch the Tony Gemignani Neapolitan Pizza video on YouTube (see video below).
Scrape the dough out of the bowl and onto a well floured work surface. Pat both side of the dough ball on the flour. Gently flatten a bit and then using your finger tips, repeatedly pressing down into the dough to flatten more, avoiding the very edges so a small lip is formed. The dough is now about 6 to 8 inches in diameter.
Then, as in the video, use your hands to work/spin the dough into a thin pizza of about 1/8th inch thick and about 12 inches in diameter (for a single pizza). Enough flour underneath will help when pushing out. If the dough is cold, it’ll be more elastic and easier to push out evenly. It does take some practice, but becomes easy when you get it.
For a Roma Pizza, take a roller and after pushing out with hands, quickly roll across the dough mainly to flatten the edges. The edges will then puff up when cooking.
Preparing & Cooking:
I use a round steel pizza pan coated with a very slight amount of olive oil. The steel pan is easier than a stone or other tricks and does a decent job. To find better, you’ll just have to go to Italy. The trick is to keep the toppings cold, including the cheese so that it takes longer to cook and the crust gets crispier.
Place the flattened dough on the steel pan. The shape is not as important as an even thickness. Top the dough with 1 to 2 tablespoons of tomato sauce and spread around with a spoon.
Place whatever toppings you like (research different Neapolitan standards). The photo above is just thin sliced fresh sweet bell pepper, a little feta, and mozzarella.
Use about 4 oz of mozzarella (1/4 of typical 16 oz package) and pinch off large chunks that you place on the pizza.
Finish with a thin circular drizzle of olive oil and slide into the oven.
The oven should be as hot as possible with rack towards the top, especially is using convection setting. My oven goes to 525 degrees on convection and it takes about 6 minutes to cook, longer if there are more dense cold toppings. Neapolitan pizzas in Italy cook at 800 degrees.
For many toppings, it is best to cook them ahead of time with spices to get the most flavor. Cool them in the fridge before using and keep extras for a quick meal during the week.
One of my favorites is with mushrooms cooked with cayenne pepper, olive oil, and a little red wine. Topped along with the mushrooms I add black nicoise olives. A pizza made with sweet Vidalia onions pre-cooked until slightly caramelized is my wife’s favorite. And, the recent fresh sweet green pepper pizza was really good. I had a potato pizza at an amazing restaurant in Trastevere called Bir & Fud (they serve Roma pizzas). The potatoes were sliced thin and pre-cooked in olive oil and salt to slightly browned, but still soft. This is another favorite and I add feta along with the mozzarella.
Hope your friends enjoy this Tatiana!
3.17.2011
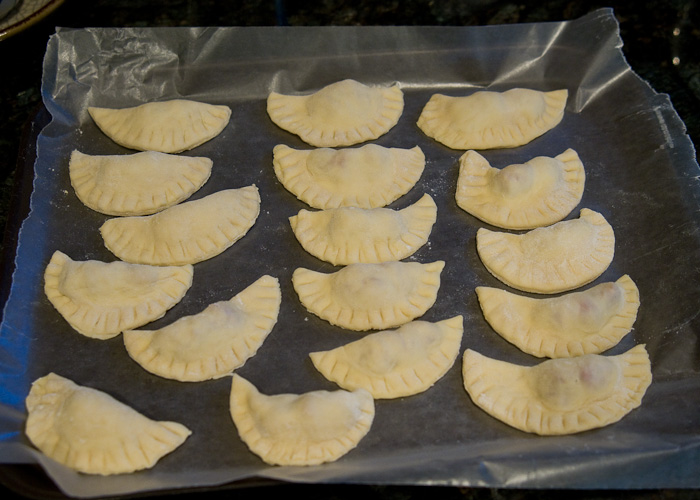
Cherry Vareniki

Cherry Vareniki
This recipe is an evolution of several recipes and made for an authentic Vareniki as well as ease of preparation. Makes approximately 30 Vareniki.
Dough:
2 1/2 cups King Arthur flour ~1 1/8 cups all-purpose & ~1 1/8 cups bread flour. (why use King Arthur flour)
1 egg
1/2 cup plain organic whole milk yogurt (Stonyfield or equiv)
1/2 teaspoon salt
In a small bowl, beat the egg with a fork and then stir in the yogurt to form a mixture. Mix this and the salt into approximately 2 cups of the flour and knead until smooth and elastic. Add more of the flour until dough becomes supple and does not stick to the bowl. Form the dough into a ball and place inside a covered bowl and let it ‘rest’ for at least one hour. The dough can also be refrigerated for several days and then used to make the Vareniki.
Cherry Filling and Sauce:
1 can of organic tart cherries
Reserved juice from canned cherries
1 tablespoon sugar
Approximately 1 to 1.5 cups of real cranberry juice with other flavor such as raspberry or blackberry (I use Northland 100% juice with no sugar added)
Drain the cherries very well against the side of a strainer, squeezing out as much of the juice as possible. Reserve the cherry juice. Sprinkle the cherries with sugar and mix in. Let stand for a while and then press and drain again more juice.
To make the sauce, mix the cherry and cranberry juices and bring to a boil over medium heat. Boil the mixture until it reduces to about one quarter its original amount. Add sugar if needed. Cool.
Vareniki Making:
Place the cherries onto a plate covered in a few paper towels. Pat the cherries to remove more liquid so they are pretty dry. When excess cherry juice gets onto the edges of the dough, they won’t stick together and will leak when cooking.
On a floured work surface, take half the dough at a time and roll it with your hands into a long log about 3/4 to 1 inch in diameter. Cut off about 3/4 of an inch and pat both sides of the cut medallion in flour. With a rolling pin roll the medallion into a very thin sheet about 4 by 4 inches. Use flour as necessary to keep it from sticking too badly.

Peel the sheet up and place in your hand with the stickiest side up. Place about 2 to 3 cherries in the center, wipe cherry juice off of fingers, and then fold and close up cherries in the dough so there aren’t any large air pockets, but being careful not to allow juice to squeeze out on the dough.

Squeeze the dough together and place on the work surface. Use a glass with a diameter of 2 to 3 inches and press down to get a half circle shape on the Vareniki. Pull off the excess dough and then lift the glass. Save this dough and remix thoroughly at the end and make more Vareniki. Press a fork carefully onto the Vareniki to seal the edges.
Arrange them on a pan covered in wax paper or dusted with flour and, if the Vareniki are not going to be immediately cooked, they can be frozen and then placed into a bag for storage.
To Cook and Serve:
Bring a pot of salted water to a rolling boil. Drop the Varenkini one by one into the boiling water but not so many that they are crowed and stick together. Boil the fresh ones for about one minute, the frozen for up to one minute longer. Remove with a slotted spoon draining off as much water as possible.
Serve in a bowl with a few teaspoons of the cherry sauce drizzled over the top.
Tricks of this recipe are to figure out how wet the dough should be; drying the cherries so they don’t leak juice onto the dough when making the Vareniki; rolling the dough thin enough, but not too thin; and, flouring the work surface and pin sufficiently when rolling.
Making the Varenkini takes about 45 minutes and since only about 4 or 5 are eaten per serving, the frozen ones will last for many meals.
3.14.2011
Rustic Italian Bread

Rustic Italian Bread for Tatiana
This recipe evolved from a Cook’s Illustrated recipe. It has been made simpler and less fufi. It’s all about making bread in the real world. Although it takes many hours until you get bread, once you’ve done it the total actual hands-on time is about 20 minutes.
A starter, or Biga, is made in advance of the dough. The recipe makes two long loaves or one very large loaf. To make scooping/scraping dough out or cleaning up easier, make a scraper out of the lids (cut in half) of large plastic yogurt or sour cream containers. Time from start of main dough to finish, including work times, is just over 4 hours, then about 30 minutes to cool.
Ingredients:
Biga:
2 cups King Arthur Bread Flour (why use King Arthur)
1/4 teaspoon active dry yeast
1 cup (8 oz) water
Dough:
3 cups of King Arthur Bread Flour
1 teaspoon active dry yeast
1 1/3 cups (10.7 oz) water
2 teaspoons sea salt
Directions:
Biga:
Combine flour, yeast, and water in bowl of standing mixer fitted with dough hook. Knead on lowest 1 to 2 speed until it forms a shaggy dough, usually 2 to 3 minutes. Transfer biga to medium bowl, cover tightly with plastic wrap, and let stand at room temperature until beginning to bubble and rise, about 3 to 4 hours. Refrigerate biga at least 8 hours or up to 24 hours. If making bread in one day, make biga by mid-morning and use for bread in the late afternoon – the flavor is acceptable, but not quite as good as biga that ferments for 20 hours.
Dough:
1. Remove the biga from refrigerator and it let stand at room temperature while making dough.
2. Add the yeast to the water, stir, and let it dissolve while measuring out the flour.
3. Combine flour, yeast, and water in bowl of the standing mixer fitted with dough hook. Knead the dough on low 1 to 2 speed until rough dough is formed, about 2 to 3 minutes.
4. Turn the mixer off and remove the dough hook into the mixer bowl, cover the bowl with a plate or loosely with plastic wrap. Let the dough ‘rest’ for 20 minutes.
5. Uncover and reattach the dough hook to the mixer and add the biga and salt to bowl. Continue to knead on the lowest speed until ingredients are incorporated (dough should clear the sides of the bowl but should stick to the very bottom), about 2 minutes. Add a small amount of flour during kneading so that the dough is not too wet. I like it so it does not stick to the bottom of the mixing bowl in speed 2. Experiment.
6. Increase the mixer speed to low (speed 2 on a KitchenAid) and continue until the dough forms a more cohesive ball, about 2 to 3 minutes.
7. Transfer the dough to a large bowl (at least 3 times the size of the dough) and cover it with a plate or plastic wrap. Let the dough rise about 50 minutes at warm room temperature and 10 to 15 minutes longer if much cooler.
8. Remove the cover and turn the dough following illustrations below on Turning the Dough. Replace the cover and let the dough rise another 50 minutes.
9. Dust the work surface liberally with flour. Hold the bowl with the dough at an angle and gently scrape the dough out of the bowl and onto the work surface.
10. If you want two smaller loaves, cut the dough into two equal halves.
11. Dust the dough and your hands liberally with flour and, using minimal pressure, push dough into a rough 12 to 14-inch square. If you are making two loaves, shape each piece into a smaller rectangle. Shape the dough following the illustrations below on Shaping the Loaf. Pinch the seam to seal it.
12. Transfer the one-large loaf to a large pan (seam down) that has been wiped with a small bit of olive oil to keep from sticking after baking. Dust loaf liberally with flour and cover loosely with plastic wrap or a light dish towel. For two loaves use a large flat pan or a large perforated bread pan. Let loaf/loaves rise until doubled in size, about 1 hour.
13. Meanwhile, adjust the oven rack to the middle position and pre-heat the oven to 475 degrees so that it gets to temperature by the end of last 1 hour rising.
14. Get ready some flour in a small sieve for dusting, a pair of scissors, and a spray bottle of water.
15. Cut a slit at least a half inch deep across the top of the loaf (from about 2 inches in from the ends), taking care to be smooth and not collapse the dough. Dust the cut liberally with flour, and then lightly spray the top of the loaf with water, with the flour in the cut being more thoroughly soaked. The wetness keeps the dough elastic during the big oven rise and you get a bigger and fluffier loaf of bread.
16. Bake at 475 for about 10 minutes, then lower to about 420 to 425 for 22 to 24 minutes for one large loaf and 20 to 22 minutes for two loaves. Baking time may vary and the loaf should be well browned when done. Ovens differ greatly and my piece of junk likes to stay overly hot, sometimes at 450, but the loaves still come out great.
17. Cool on a wire rack for about 30 minutes. Listen to the popping and crackling of the thick crust as it cools – a mouth watering sound.
Turning the dough:
- Slide plastic bench scraper under one side of dough; gently lift and fold one third of dough toward center.
- Repeat step 1 with opposite side of dough.
- Finally, fold dough in half, perpendicular to first folds. Dough shape should be a rough square.
Shaping the dough:
- After delicately pushing dough into 12-14-inch square, fold top left corner diagonally to middle.
- Fold top right -corner to middle - looks like an envelope
- Begin to gently roll dough from top to bottom.
- Continue rolling until dough forms a rough log, pinch seam
- On the pan, gently shape dough into 16-inch football shape by tucking bottom edges underneath.
Why Use King Arthur Flour (or anything real, for that matter)
King Arthur Flour, available at Publix here in Florida, is what I call ‘real’ flour. It is not processed and here is the difference.
Bread used to be a main part of most peoples’ diet and is still a staple in most parts of the world. Wheat, ground and sifted into flour contains an amazing combination of nutrients including protein and iron. Real USA flour, like King Arthur, contains approximately 5 grams of protein per 30 grams (32 grams is an ounce), and app. 8% of USDA requirement of Iron. This flour is not processed and it is not ‘enriched’. It meets FDA requirements for being legally called flour in the US.
The typical brand name flours and foods in the US contain processed enriched flour. Often, artificial dough conditioners are required to make them act like real flour. These flours are chemically processed to remove most of the high quality compounds, such as iron, and then to make it legal in the US, cheaper chemicals are added back in. High quality iron is chemically extracted during processing (you can buy expensive multivitamins if you want to get it back) and cheaper iron in the form of ferrous sulfate is artificially added back in.
Enriched flour is essentially a fast-absorbing sugar starch with a minimum of 5 FDA required compounds added back. Fast sugars digest quickly and cause sugar spikes in your body leading to diabetes and other ailments, including hunger long before the next meal, so eat more! For instance, supermarket english muffins with enriched wheat flour contain only 2 grams of protein per 30 grams (label has 4 g per 57 g serving) and only 5% of the cheaper iron added back.
If you think this is a terrible thing, then you need to think a little about the US economy and governmental philosophy. The US is economically an amazingly free country as compared to most other more advanced countries in the world. In Italy, food is made with pride and it is about quality first – but they still have to make a living. Food is expensive, real, without preservatives, and only last a short while. People there have tiny fridges and have to shop every few days. Even prepared packaged foods don’t last and have to be eaten rather soon.
In the US, the food industry is about making money. Total Blueberry and Pomegranate cereal has a picture of Blueberries on the box, but doesn’t contain either. It has artificially flavored blueberry and pomegranate “clusters” made with some cool chemicals and sugar. This is typical of 90% of what you find in a grocery store, especially if it comes in a box or a jar.
To make the most money in the very competitive food market one needs to appeal to the most people. Fortunately, most Americans don’t read labels, don’t want to take the time to prepare food, and base choices solely on what tastes the best. Real food cannot easily compete with the wonders of modern chemistry. How can they do this – understand that if it’s not illegal, it’s not wrong to do. Freedom is a wonderful thing, but if you’re not willing to learn about what’s going on around you, then you get what you get, and a weak immune system and disease will likely be one of them. Don’t blame the food corporations and the government, it’s up to the people to question and educate themselves.
So, King Arthur Flour makes real food, like Rustic Italian Bread. You can live on this stuff and not get fat. Remember to spread on lots of real butter, for taste of course, and also since the fat slows the absorption of sugar (starch digested) you won’t get blood sugar spikes and you won’t get hungry before the next meal.
Subscribe to:
Comments (Atom)